Sunday, December 27, 2015

In love with double slider card

I was watching video's on youtube and came across this beautiful technique of making double slider card and fell in love with it. Thanks to Rajni's creativity for the tutorial.
this is the link to her channel  https://www.youtube.com/channel/UCSAGmyP0_-tmErVIgvPSvwg


check the video for more details. the video was taken before writing message.


Hope you guys will enjoy it.

my recent orders

Hello friends,
I was away from my blog as was busy with orders and faced a big loss of my life with the death of my Dad. But life has to move on with his memories with us.

Sorry for getting off track. I wanted to share with you my recent 1st birthday invitation cards i made.
Enjoy the pics.


Another order


Thank you.

Double slider card with gatefold cover

Hello friends,
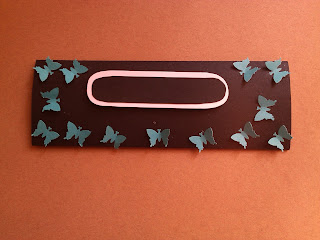
All must be busy enjoying Christmas carnivals and new year party preparations. Well i am back to my blog after long time and i am loving it. well today i have a very special card, which is actually an order. The card is without sentiment as ordered. I have used black, white cardstock and sea green photo copy paper for the die cuts and butterfly punch. So without talking much lets have a look at the card. For the color selection i was inspired from craftyscrapper's challenge.

Sorrt my for my finger tips interfering in the picture, was not able to show the complete cover.
Top cover

inside view of gatefold cover and double slider card

Double slider card with space for sentiment and white cardstock for message.


Double slider card when close. 

Hope you guys liked it. Do leave your valuable comments.


Thank You.

Friday, September 4, 2015

Upcycling at its best-2

Hello people,
As promised am back to show you what I did to my broken painting frame. Well frame was intact but glass got broken while shifting. I had a bag full of toilet tissue roll's left over cardboard rolls. My home walls are light yellow so I selected blue and black shade for my project. I colored the roll with blue Asian paint on outer side and black Asian paint from inside. Once dried I cut the roll into 5 pieces. You will get an eye shape piece. Make as many as u want for the design. Colored the inside of frame also in blue shade. I drew design on white sheet and placed the rolls over the design and joined all the rolls using hot glue gun. Made swirls from blue craft sheet. Once complete design is ready attached it to the frame and secured it with glue gun. Attached small mirrors to enhance the beauty.The single flower is rose which was extra while I made my last project" up cycling at its best". The butterflies are a gift from my aunt.  Its interesting to know that the butterflies are handmade from some birds feathers.

 Entering it to following challenges
http://allsortschallenge.blogspot.in/2015/08/week-326-recycleupcycle.html?m=1

http://rheddscreativespirit.blogspot.in/2015/09/septembers-challenge.html?m=1

Hope you all had fun.

Wednesday, September 2, 2015

Upcycling at its best

Hello crafty goddesses,


 Well after shifting to new city it took time to get used to routine but once all set was left with empty packaging boxes and one of my frame which got broken while shifting. Wanted to use the boxes as well as the painting frame. As I was an art and craft teacher I had collected so many things for my students but had a pregnancy break. So I decided to open my treasure box, where I found so many waste CDs and craft sheets of beautiful shades. Almost thought for few days what to make. Finally decided to make a photo frame to keep family photograph.
Check out my next post tomorrow to see what I did to my broken painting frame.
I wanted a round frame so used complete box to draw two circles of 30 cm. From one circle I cut out a smaller circle of around 20 cms. So I was left with a 30 cm circle and 10 cm circular frame. Now cut 2cm circular rim but measuring from outside to keep in between two circular pieces so you will have space to insert photograph. It will be like a slit we have in all readymade photoframes. I took almost 3-4 old newspaper, tore it into small pieces and covered the cardboard box with 3 layers of paper pieces. You need patience as each layer takes few hours to dry completely. Once dried I used black Asian paint to color the complete frame. By the time color dried I used scissors to cut the CDs into small pieces. You need sharp scissors yo cut the CD or it will get cracks and CD pieces will not look like mirror. Now I applied fevicol mr to the 10 cm circular rim and started arranging the CD pieces. Later I took cherry red craft sheet and cut it into several small squares to make rolled flower. I make around 40 flowers. I stuck the flowers to outer rim using hot glue gun. And 12 to internal rim. Sorry was not able to take stepwise pics but have tried to explain it as much as possible. Finally I took dark and light pink woolen treads, rolled both around and tied a knot and used hot glue gun to adhere it on backside of frame.


Entering it to following challenges.
http://allsortschallenge.blogspot.in/2015/08/week-326-recycleupcycle.html?m=1

http://rheddscreativespirit.blogspot.in/2015/09/septembers-challenge.html?m=1

Thursday, August 27, 2015

Rakshabandhan platter card

Hello friends,
 Well am here to quickly share my platter card i made for my brother for special occasion of rakshabandhan. Well i saw such card few months back on you tube and decided to try it but my little angel used to keep me on my toes. Finally tried it today. I have used watercolor pencils to create a book eh effect.Used distress inks to Color the inside and bottom of the box.Stamped the sentiment, sentiments are from my own stamp release collection which will be out soon.


Hope you liked it. 
Entering it to following challenges
http://www.ttcrd.blogspot.sg/2015/08/ttcrd-challenge-august-25-august-31.html?m=1

http://stamplorations.blogspot.in/2015/08/august-challenge.html?m=1#


http://fabnfunkychallenges.blogspot.in/2015/08/challenge-270-things-with-wings_12.html?m=1


http://theartisticstampercreativeteam.blogspot.in/2015/08/augusts-creative-challenge-anything-goes.html?m=1

http://craftygirlzchallenges.blogspot.in/2015/08/challenge-5.html?m=1


Baby treasure mini album

Hello,
 Well feeling so happy after winning a challenge at stampinroyalty challenges.
I am here with my new art work inspired from lulupu blog challenge-"baby- lil bit of heaven."
In the meanwhile got an order about a special gift for baby shower.
So have a look what i came up with. Its a photo heavy post so grab your coffee and enjoy it.
Sorry for bad photography but will improve on it next time.
album cover

 Treasure album cover- used a packaging box which i had as we recently shifted to new city. handmade flower without dies or pattern, acetate sheet for photo, pearl line for decoration and the angel i got it from coloring pages i had.


Page 1: sorry name got hidden behind the bow. the flowers are handmade and used golden net to make a bunch.

page 2 left
page 2 right
page 3 left
Page 2:first day special moments captured. empty space left for pics and a small pocket to insert baby pic. peacock stamp is from my recent stamp release.
page 3 right
 Page 3:details about important milestones achieved like first movement, first smile, first turn over,etc. the flower stamp is from itsy bitsy
page 4 left

page 4 right

page 5 left

page 5 right
page 6 left

page 6 right


page 7 left

close up of handmade flower

beautiful birthday poem
page 7 right


album end cover


Page4:baby"s first photo shoot. have used the beautiful frock cut out which i got as gift from itsybitsy along with my order. sunflower stamp is from my recent stamp release.


Page 5: baby's first day out in nature. its fun watching babies how keenly they observe each and every details. used stamps from technique tuesday and distress inks.


Page6: Most amazing thing baby's varied expression that bring smile on our face so why not capture it and save it for lifetime. Again the flower stamp is from my recent stamp release


Page 7: first birthday-adhered a small gate fold red paper with handmade flower and hero art stamp which i won from crafter's corner.


The peacock feather stamp is from hot off the press and have used distress ink.


Album end i attached a pic where a baby is peeping out of pearl shell. the customer wanted me to leave it blank as she wanted to write her own message and didn't  bind the album as she had some memories she wanted to insert in between.


Hope you guys enjoyed it.

entering it to
http://www.lulupu.blogspot.in/2015/08/lulupu-challenge52-baby-little-bit-of.html
http://www.ttcrd.blogspot.sg/2015/08/ttcrd-challenge-august-25-august-31.html?m=1
http://craftygirlzchallenges.blogspot.in/2015/08/challenge-5.html?m=1
http://theartisticstampercreativeteam.blogspot.in/2015/08/augusts-creative-challenge-anything-goes.html?m=1


http://simplycreatetoo.blogspot.in/2015/08/ch-93-its-special-occasion.html?m=1http://rheddscreativespirit.blogspot.in/2015/08/august-challenge.html?m=1

Tuesday, August 25, 2015

stampinroyalty challenge


Hello friends,
 Here is my quick post about the napkin fold card I made for the stampinroyalty challenge #291.

Have used embossing folders from itsybitsy. Used distress ink to highlight the embossed image. Made a small envelop for the message and kept it inside the card. Rest is visible how I have stuck punched paper and pearl line to the butterfly which i got from local shop.


Entering it to

http://stampinroyalty.blogspot.in/2015/08/stampin-royalty-challenge-291.html?m=1

http://simplycreatetoo.blogspot.in/2015/08/mid-post-ch-92-anthing-goes-favorites.html?m=1

http://fabnfunkychallenges.blogspot.in/2015/08/challenge-270-things-with-wings_12.html?m=1


http://craftygirlzchallenges.blogspot.in/2015/08/challenge-5.html?m=1

http://theartisticstampercreativeteam.blogspot.in/2015/08/augusts-creative-challenge-anything-goes.html?m=1

Monday, August 24, 2015

New stamp release.

Hello all worderful people out there.
 I am happy to announce my first ever stamp release. I am sure you all will fall in love with these stamps.
There are lot more to come.

    To show you all craft lovers I have made tags using the stamps.

 To make this tag I have used floral delight 1 ( roses) stamp. I stamped the image using versa fine white on red card stock. Used fabric bleach for some shading. Used it for first time by getting inspired from Rajni Chawla mam's post. 
Sentiment is also a part of my new stamp release. Painted the tag using metallic liquid colors and used glass paints for the dots. Used foam tape to adhere the fussy cut roses and sentiment on the tag.

For this tag I have used magical peacock stamp and used distress inks and watercolor pens for coloring. I wanted the blue and green to blend and give a natural look, while going through various blogs came across an usefull post by Neha bhatt about inks and its uses. She very beautifully explained how water markers will bleed if image is filled with same medium colors. Used the same logic and stamped the peacock using blue Faber castle ink pad and colored using distress ink peacock feather. Also used green and blue watercolor pens. To highlight the feathers used blue glitter pen. Stamped the background using white versafine ink pad. Stamped in white to show common crowd and colored one peacock to separate it from crowd. Fussy cut the colored image as well as the sentiment and used foam tape to attach it on the tag.

This is my personal favourite, floral delight 2 ( sunflowers) stamp. I have used memory box stencil for the background. Painted background using liquid pearl colors. Stamped the flowers on white card stock and painted it using distress inks, fussy cut it and attached in on white card stock which I cut in a wavy shape to give look of window. Stamped the sentiment on white card stock and used foam tape to attach it on the tag.

 Here are the stamped images of the stamps without coloring for a clear view.
 Hope you all enjoyed it.
To order one check out my Facebook page.
https://m.facebook.com/RAVISHING.ART?ref=bookmarks


Floral delight 1 ( roses)

Floral delight 2 ( sunflowers)

 Magical peacock
Entering it to following challenges:

http://simplycreatetoo.blogspot.in/2015/08/mid-post-ch-92-anthing-goes-favorites.html?m=1

http://rheddscreativespirit.blogspot.in/2015/08/august-challenge.html?m=1


http://theartisticstampercreativeteam.blogspot.in/2015/08/augusts-creative-challenge-anything-goes.html?m=1

http://craftygirlzchallenges.blogspot.in/2015/08/challenge-5.html?m=1
See you all soon.